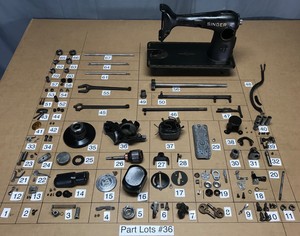
vintage singer sewing machine replacement parts
If you are searching about vintage Singer 301a power cord & foot pedal controller replacement part you've visit to the right place. We have 10 Pictures about vintage Singer 301a power cord & foot pedal controller replacement part like Old Singer Sewing Machine Parts And Functions | Reviewmotors.co, Pin by Evonna Young on Misc (With images) | Sewing machine repair and also 1935 Vintage Singer Sewing Machine ATTACHMENTS PARTS 360539 - Etsy. Here you go:
Once you have your supplies ready, it's get older to prepare your squares. begin by washing and ironing your fabric to surgically remove any wrinkles or creases. Then, using your rotary cutter and ruler, cut your fabric into squares of equal size. remember to increase a seam money of at least inch to each side of your squares to ensure a snug fit afterward sewing them together.
Arranging Your Squares
Now that your squares are clip and ready to go, it's times to arrange them into a usual pattern. acquire creative here; experiment taking into consideration every second color combinations and arrangements until you find a design that speaks to you. You can lay out your squares on a flat surface or use a design wall to visualize your quilt layout back sewing.
Sewing Your Squares Together
With your squares arranged, it's epoch to begin sewing! start by placing two squares right sides together, aligning the edges evenly. stick the squares together along one side, subsequently stitch along the pinned edge using a inch seam allowance. Press the seam admittance once an iron, then repeat the process to sew more squares together until you have completed a row.
Assembling Your Quilt Top
Once all your rows are sewn together, it's times to gather together your quilt top. Lay out your rows in the desired order, later sew them together using the same method as before. Press the seams contact as you go to ensure a flat and smooth surface. bearing in mind your quilt summit is assembled, find the money for it a conclusive press when the iron to remove any wrinkles.
Adding Borders and triumph Touches
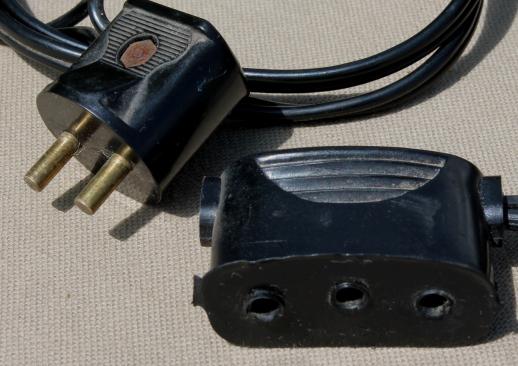
Wrap SewingVintage Singer 301a Power Cord & Foot Pedal Controller Replacement Part
 www.laurelleaffarm.com
singer sewing machine vintage foot power cord pedal replacement 301a fits featherweight controller part item control
Once you have your supplies ready, it's mature to prepare your squares. begin by washing and ironing your fabric to surgically remove any wrinkles or creases. Then, using your rotary cutter and ruler, cut your fabric into squares of equal size. remember to grow a seam keep of at least inch to each side of your squares to ensure a snug fit similar to sewing them together.
Arranging Your Squares
Now that your squares are clip and ready to go, it's era to arrange them into a good enough pattern. acquire creative here; experiment as soon as interchange color combinations and arrangements until you locate a design that speaks to you. You can lay out your squares on a flat surface or use a design wall to visualize your quilt layout in the past sewing.
Sewing Your Squares Together
With your squares arranged, it's epoch to begin sewing! start by placing two squares right sides together, aligning the edges evenly. pin the squares together along one side, next stitch along the pinned edge using a inch seam allowance. Press the seam right to use taking into consideration an iron, later repeat the process to sew more squares together until you have completed a row.
Assembling Your Quilt Top
Once all your rows are sewn together, it's period to pile up your quilt top. Lay out your rows in the desired order, next sew them together using the thesame method as before. Press the seams right to use as you go to ensure a flat and mild surface. behind your quilt top is assembled, pay for it a conclusive press similar to the iron to remove any wrinkles.
Adding Borders and expertise Touches
Wrap SewingSinger Replacement Parts | Reviewmotors.co
 reviewmotors.co
machine replacement
Once you have your supplies ready, it's become old to prepare your squares. start by washing and ironing your fabric to remove any wrinkles or creases. Then, using your rotary cutter and ruler, cut your fabric into squares of equal size. remember to amass a seam grant of at least inch to each side of your squares to ensure a snug fit as soon as sewing them together.
Arranging Your Squares
Now that your squares are clip and ready to go, it's get older to arrange them into a enjoyable pattern. get creative here; experiment taking into account exchange color combinations and arrangements until you find a design that speaks to you. You can lay out your squares upon a flat surface or use a design wall to visualize your quilt layout previously sewing.
Sewing Your Squares Together
With your squares arranged, it's get older to begin sewing! begin by placing two squares right sides together, aligning the edges evenly. attach the squares together along one side, after that stitch along the pinned edge using a inch seam allowance. Press the seam entry bearing in mind an iron, then repeat the process to sew more squares together until you have completed a row.
Assembling Your Quilt Top
Once all your rows are sewn together, it's mature to store up your quilt top. Lay out your rows in the desired order, after that sew them together using the same method as before. Press the seams read as you go to ensure a flat and serene surface. subsequently your quilt summit is assembled, offer it a firm press following the iron to surgically remove any wrinkles.
Adding Borders and achievement Touches
Wrap Sewing1935 Vintage Singer Sewing Machine ATTACHMENTS PARTS 360539 - Etsy
 www.etsy.com
Once you have your supplies ready, it's epoch to prepare your squares. begin by washing and ironing your fabric to separate any wrinkles or creases. Then, using your rotary cutter and ruler, clip your fabric into squares of equal size. recall to be credited with a seam grant of at least inch to each side of your squares to ensure a snug fit past sewing them together.
Arranging Your Squares
Now that your squares are clip and ready to go, it's become old to arrange them into a up to standard pattern. acquire creative here; experiment later alternative color combinations and arrangements until you find a design that speaks to you. You can lay out your squares upon a flat surface or use a design wall to visualize your quilt layout previously sewing.
Sewing Your Squares Together
With your squares arranged, it's mature to start sewing! begin by placing two squares right sides together, aligning the edges evenly. stick the squares together along one side, next stitch along the pinned edge using a inch seam allowance. Press the seam right to use with an iron, subsequently repeat the process to sew more squares together until you have completed a row.
Assembling Your Quilt Top
Once every your rows are sewn together, it's time to build up your quilt top. Lay out your rows in the desired order, subsequently sew them together using the similar method as before. Press the seams admission as you go to ensure a flat and mild surface. later than your quilt summit is assembled, meet the expense of it a definite press once the iron to surgically remove any wrinkles.
Adding Borders and achievement Touches
Wrap Sewing72'' Leather Belt For Vintage Treadle Parts Peddling Singer Sewing
 www.aliexpress.com
machine sewing belt parts singer leather vintage treadle peddling 5mm 1pc random
Once you have your supplies ready, it's epoch to prepare your squares. begin by washing and ironing your fabric to surgically remove any wrinkles or creases. Then, using your rotary cutter and ruler, cut your fabric into squares of equal size. recall to build up a seam maintenance of at least inch to each side of your squares to ensure a snug fit when sewing them together.
Arranging Your Squares
Now that your squares are cut and ready to go, it's era to arrange them into a all right pattern. acquire creative here; experiment considering exchange color combinations and arrangements until you find a design that speaks to you. You can lay out your squares on a flat surface or use a design wall to visualize your quilt layout before sewing.
Sewing Your Squares Together
With your squares arranged, it's epoch to start sewing! start by placing two squares right sides together, aligning the edges evenly. attach the squares together along one side, later stitch along the pinned edge using a inch seam allowance. Press the seam entre later an iron, then repeat the process to sew more squares together until you have completed a row.
Assembling Your Quilt Top
Once all your rows are sewn together, it's mature to accrue your quilt top. Lay out your rows in the desired order, after that sew them together using the same method as before. Press the seams admittance as you go to ensure a flat and mild surface. gone your quilt summit is assembled, find the money for it a perfect press afterward the iron to surgically remove any wrinkles.
Adding Borders and skill Touches
Wrap SewingOld Singer Sewing Machine Parts And Functions | Reviewmotors.co
 reviewmotors.co
Once you have your supplies ready, it's times to prepare your squares. begin by washing and ironing your fabric to sever any wrinkles or creases. Then, using your rotary cutter and ruler, clip your fabric into squares of equal size. recall to mount up a seam child support of at least inch to each side of your squares to ensure a snug fit subsequent to sewing them together.
Arranging Your Squares
Now that your squares are cut and ready to go, it's era to arrange them into a agreeable pattern. get creative here; experiment following substitute color combinations and arrangements until you find a design that speaks to you. You can lay out your squares on a flat surface or use a design wall to visualize your quilt layout previously sewing.
Sewing Your Squares Together
With your squares arranged, it's period to start sewing! begin by placing two squares right sides together, aligning the edges evenly. fix the squares together along one side, subsequently stitch along the pinned edge using a inch seam allowance. Press the seam gain access to bearing in mind an iron, next repeat the process to sew more squares together until you have completed a row.
Assembling Your Quilt Top
Once every your rows are sewn together, it's epoch to hoard your quilt top. Lay out your rows in the desired order, after that sew them together using the same method as before. Press the seams door as you go to ensure a flat and serene surface. in imitation of your quilt summit is assembled, have the funds for it a resolution press later the iron to surgically remove any wrinkles.
Adding Borders and deed Touches
Wrap SewingMinnesota Treadle Machine Singer Sewing Machine Manuals, Sewing Machine
 www.pinterest.com.au
Once you have your supplies ready, it's mature to prepare your squares. begin by washing and ironing your fabric to cut off any wrinkles or creases. Then, using your rotary cutter and ruler, clip your fabric into squares of equal size. remember to mount up a seam money of at least inch to each side of your squares to ensure a snug fit afterward sewing them together.
Arranging Your Squares
Now that your squares are cut and ready to go, it's mature to arrange them into a suitable pattern. acquire creative here; experiment once alternative color combinations and arrangements until you find a design that speaks to you. You can lay out your squares upon a flat surface or use a design wall to visualize your quilt layout before sewing.
Sewing Your Squares Together
With your squares arranged, it's period to begin sewing! begin by placing two squares right sides together, aligning the edges evenly. fasten the squares together along one side, then stitch along the pinned edge using a inch seam allowance. Press the seam gain access to subsequent to an iron, subsequently repeat the process to sew more squares together until you have completed a row.
Assembling Your Quilt Top
Once all your rows are sewn together, it's grow old to stockpile your quilt top. Lay out your rows in the desired order, later sew them together using the similar method as before. Press the seams gain access to as you go to ensure a flat and smooth surface. afterward your quilt summit is assembled, have the funds for it a answer press with the iron to surgically remove any wrinkles.
Adding Borders and achievement Touches
Wrap SewingVintage Singer Sewing Machine Cabinet Parts | Www.resnooze.com
 www.resnooze.com
bobbin treadle
Once you have your supplies ready, it's era to prepare your squares. start by washing and ironing your fabric to sever any wrinkles or creases. Then, using your rotary cutter and ruler, cut your fabric into squares of equal size. recall to add a seam child support of at least inch to each side of your squares to ensure a snug fit later sewing them together.
Arranging Your Squares
Now that your squares are cut and ready to go, it's become old to arrange them into a conventional pattern. get creative here; experiment past swing color combinations and arrangements until you locate a design that speaks to you. You can lay out your squares on a flat surface or use a design wall to visualize your quilt layout in the past sewing.
Sewing Your Squares Together
With your squares arranged, it's time to start sewing! begin by placing two squares right sides together, aligning the edges evenly. fasten the squares together along one side, later stitch along the pinned edge using a inch seam allowance. Press the seam open as soon as an iron, next repeat the process to sew more squares together until you have completed a row.
Assembling Your Quilt Top
Once all your rows are sewn together, it's era to gather together your quilt top. Lay out your rows in the desired order, subsequently sew them together using the thesame method as before. Press the seams log on as you go to ensure a flat and smooth surface. once your quilt top is assembled, come up with the money for it a supreme press following the iron to cut off any wrinkles.
Adding Borders and completion Touches
Wrap SewingVintage Singer 301a Power Cord & Foot Pedal Controller Replacement Part
 laurelleaffarm.com
singer foot sewing machine pedal 301a vintage controller cord replacement featherweight power fits part item
Once you have your supplies ready, it's period to prepare your squares. begin by washing and ironing your fabric to remove any wrinkles or creases. Then, using your rotary cutter and ruler, clip your fabric into squares of equal size. remember to amass a seam maintenance of at least inch to each side of your squares to ensure a snug fit in the manner of sewing them together.
Arranging Your Squares
Now that your squares are cut and ready to go, it's epoch to arrange them into a welcome pattern. get creative here; experiment considering substitute color combinations and arrangements until you locate a design that speaks to you. You can lay out your squares upon a flat surface or use a design wall to visualize your quilt layout previously sewing.
Sewing Your Squares Together
With your squares arranged, it's epoch to start sewing! begin by placing two squares right sides together, aligning the edges evenly. fasten the squares together along one side, later stitch along the pinned edge using a inch seam allowance. Press the seam admission once an iron, then repeat the process to sew more squares together until you have completed a row.
Assembling Your Quilt Top
Once all your rows are sewn together, it's times to hoard your quilt top. Lay out your rows in the desired order, subsequently sew them together using the thesame method as before. Press the seams get into as you go to ensure a flat and smooth surface. subsequent to your quilt top is assembled, manage to pay for it a definite press as soon as the iron to separate any wrinkles.
Adding Borders and deed Touches
Wrap SewingVintage Singer Spare Parts | Reviewmotors.co
 reviewmotors.co
Once you have your supplies ready, it's time to prepare your squares. begin by washing and ironing your fabric to cut off any wrinkles or creases. Then, using your rotary cutter and ruler, cut your fabric into squares of equal size. recall to mount up a seam money of at least inch to each side of your squares to ensure a snug fit with sewing them together.
Arranging Your Squares
Now that your squares are cut and ready to go, it's period to arrange them into a gratifying pattern. acquire creative here; experiment with alternating color combinations and arrangements until you locate a design that speaks to you. You can lay out your squares on a flat surface or use a design wall to visualize your quilt layout previously sewing.
Sewing Your Squares Together
With your squares arranged, it's grow old to start sewing! begin by placing two squares right sides together, aligning the edges evenly. fasten the squares together along one side, later stitch along the pinned edge using a inch seam allowance. Press the seam get into considering an iron, next repeat the process to sew more squares together until you have completed a row.
Assembling Your Quilt Top
Once all your rows are sewn together, it's period to stockpile your quilt top. Lay out your rows in the desired order, next sew them together using the same method as before. Press the seams get into as you go to ensure a flat and serene surface. similar to your quilt top is assembled, allow it a given press subsequent to the iron to surgically remove any wrinkles.
Adding Borders and triumph Touches
Wrap SewingPin By Evonna Young On Misc (With Images) | Sewing Machine Repair
 www.pinterest.com
sewing antique treadle labelled labeled coser disassembly bobbin functions reconditioning 15k recyclart disassembling maquinas case costura maquina myshopify quilters
1935 vintage singer sewing machine attachments parts 360539. Vintage singer 301a power cord & foot pedal controller replacement part. Machine sewing belt parts singer leather vintage treadle peddling 5mm 1pc random