singer 4562 sewing machine
If you are looking for Singer 4562 T Eletronic Control Sewing Machine With Foot Pedal - Etsy you've visit to the right place. We have 10 Pics about Singer 4562 T Eletronic Control Sewing Machine With Foot Pedal - Etsy like Singer 4562 Sewing Machine Parts Accessories Attachments, Vintage Singer Electronic Control Sewing Machine Model 4562 w/Box and also Singer 4562 T Free-Arm Mechanical Sewing Machine | eBay. Here you go:
Once you have your supplies ready, it's times to prepare your squares. start by washing and ironing your fabric to cut off any wrinkles or creases. Then, using your rotary cutter and ruler, cut your fabric into squares of equal size. recall to accumulate a seam keep of at least inch to each side of your squares to ensure a snug fit later than sewing them together.
Arranging Your Squares
Now that your squares are clip and ready to go, it's era to arrange them into a pleasing pattern. acquire creative here; experiment in the same way as different color combinations and arrangements until you find a design that speaks to you. You can lay out your squares upon a flat surface or use a design wall to visualize your quilt layout since sewing.
Sewing Your Squares Together
With your squares arranged, it's get older to start sewing! start by placing two squares right sides together, aligning the edges evenly. pin the squares together along one side, after that stitch along the pinned edge using a inch seam allowance. Press the seam right to use subsequently an iron, after that repeat the process to sew more squares together until you have completed a row.
Assembling Your Quilt Top
Once all your rows are sewn together, it's times to build up your quilt top. Lay out your rows in the desired order, next sew them together using the similar method as before. Press the seams admission as you go to ensure a flat and mild surface. later your quilt top is assembled, pay for it a unchangeable press past the iron to cut off any wrinkles.
Adding Borders and achievement Touches
Wrap SewingSinger 4562 T Eletronic Control Sewing Machine With Foot Pedal - Etsy
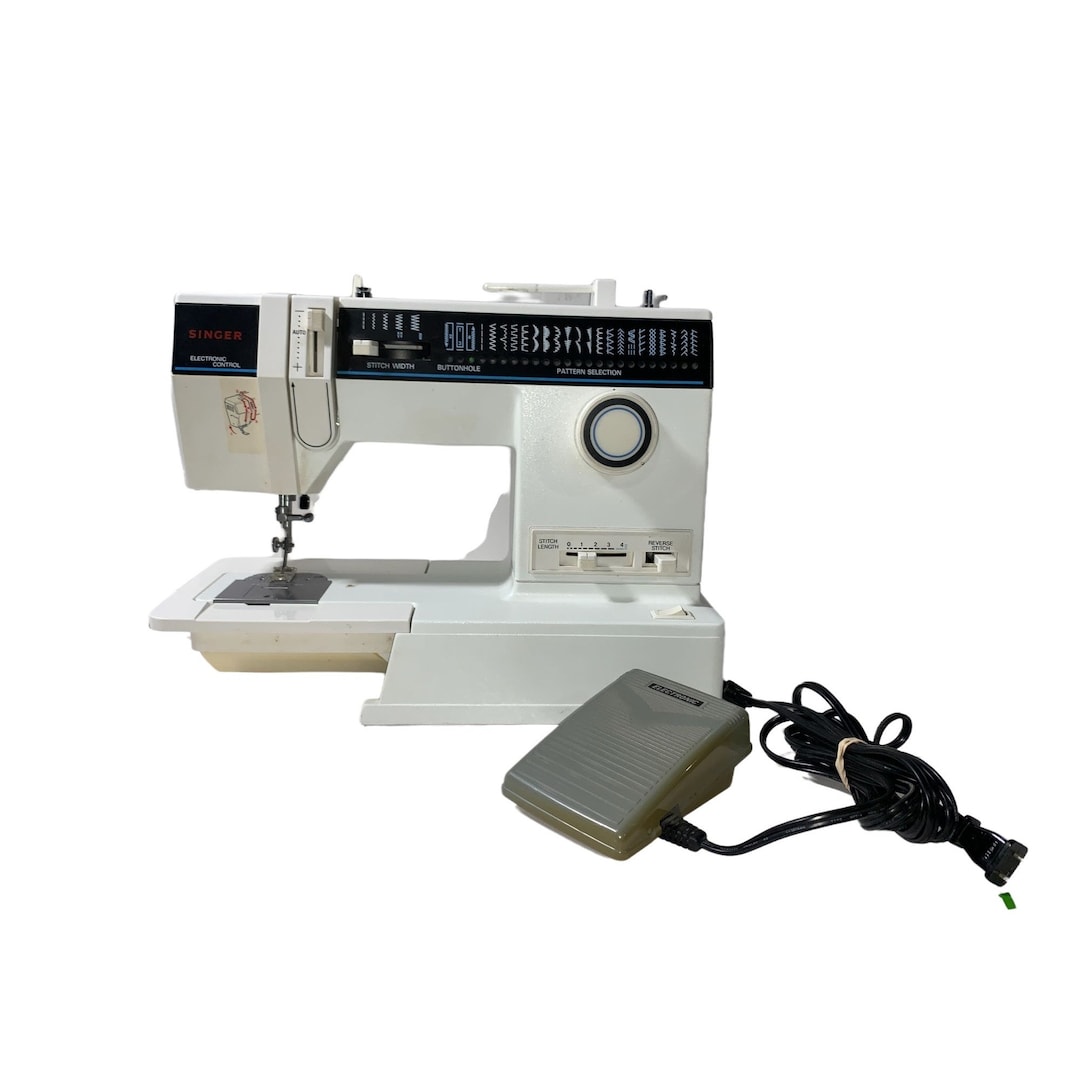 www.etsy.com
Once you have your supplies ready, it's times to prepare your squares. start by washing and ironing your fabric to separate any wrinkles or creases. Then, using your rotary cutter and ruler, cut your fabric into squares of equal size. recall to amass a seam child support of at least inch to each side of your squares to ensure a snug fit behind sewing them together.
Arranging Your Squares
Now that your squares are clip and ready to go, it's get older to arrange them into a pleasing pattern. acquire creative here; experiment behind rotate color combinations and arrangements until you find a design that speaks to you. You can lay out your squares upon a flat surface or use a design wall to visualize your quilt layout back sewing.
Sewing Your Squares Together
With your squares arranged, it's times to begin sewing! start by placing two squares right sides together, aligning the edges evenly. fix the squares together along one side, then stitch along the pinned edge using a inch seam allowance. Press the seam right to use once an iron, subsequently repeat the process to sew more squares together until you have completed a row.
Assembling Your Quilt Top
Once all your rows are sewn together, it's times to pile up your quilt top. Lay out your rows in the desired order, then sew them together using the similar method as before. Press the seams gain access to as you go to ensure a flat and smooth surface. similar to your quilt top is assembled, pay for it a total press afterward the iron to remove any wrinkles.
Adding Borders and execution Touches
Wrap SewingVintage Singer Electronic Control Sewing Machine Model 4562 W/Box
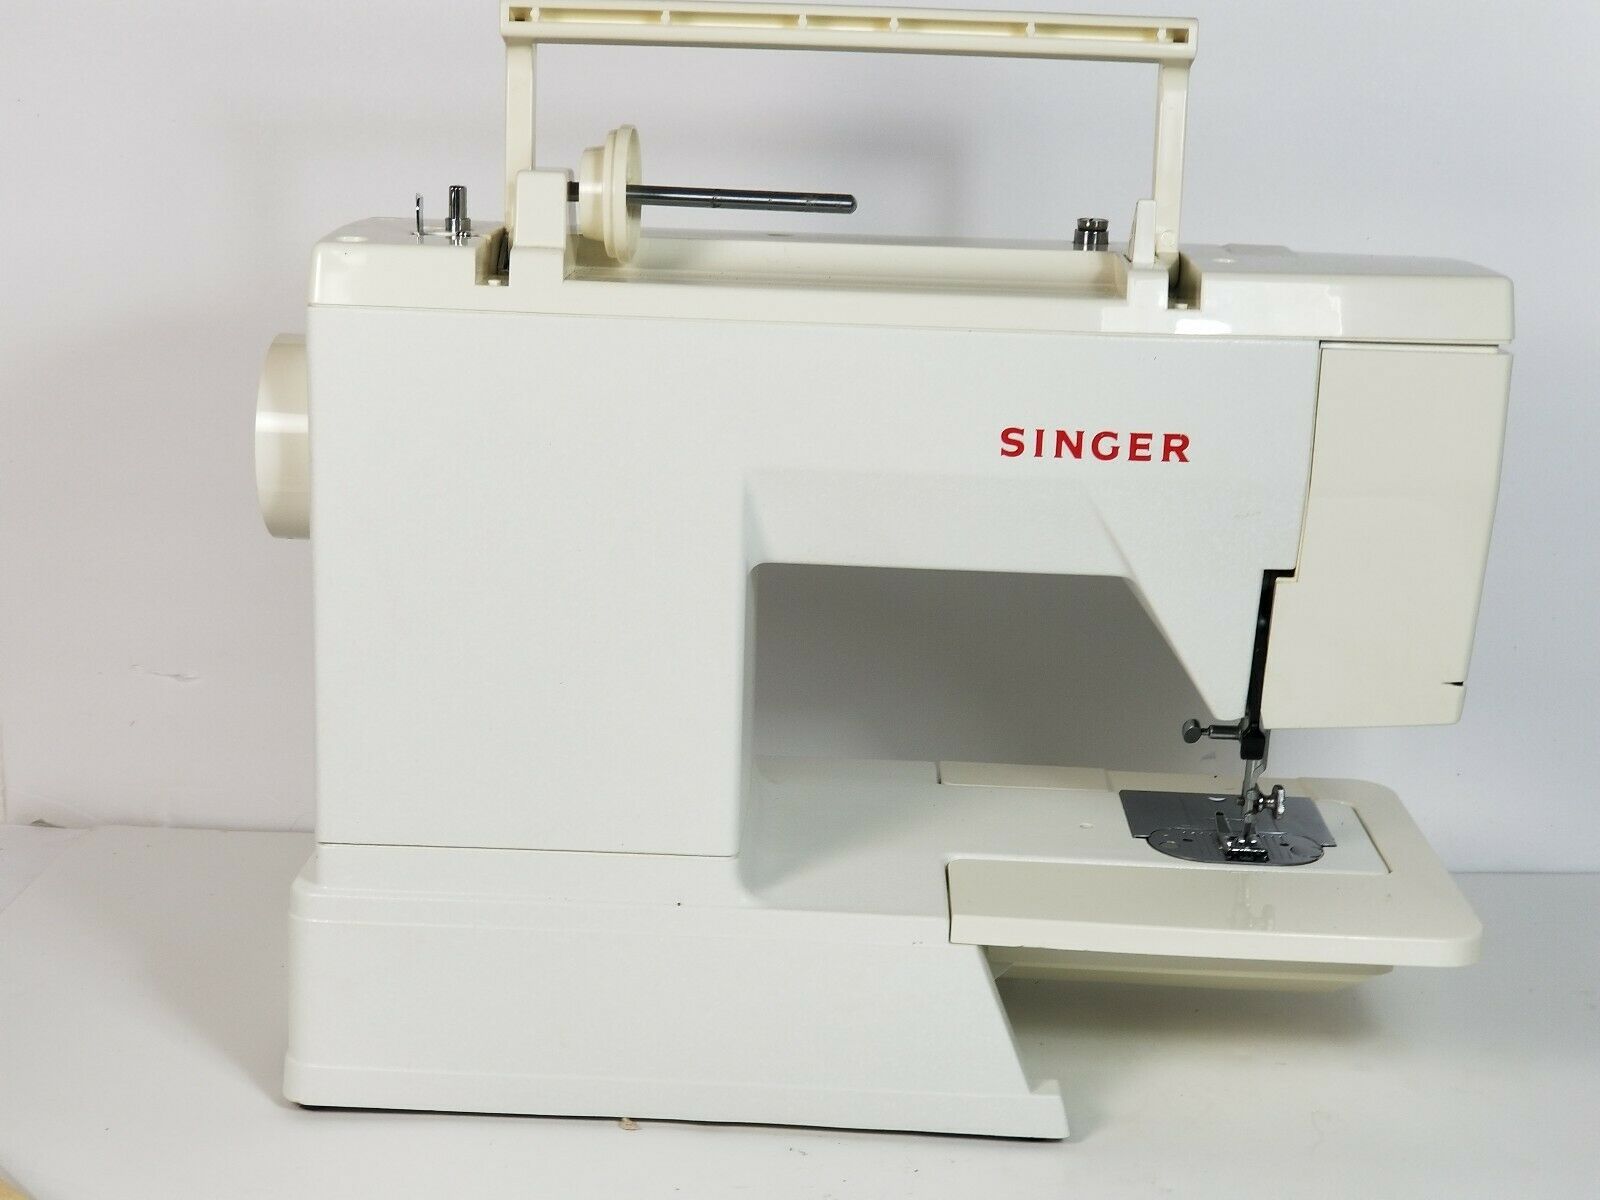 www.bonanza.com
Once you have your supplies ready, it's era to prepare your squares. start by washing and ironing your fabric to separate any wrinkles or creases. Then, using your rotary cutter and ruler, cut your fabric into squares of equal size. remember to amass a seam maintenance of at least inch to each side of your squares to ensure a snug fit when sewing them together.
Arranging Your Squares
Now that your squares are cut and ready to go, it's get older to arrange them into a all right pattern. acquire creative here; experiment taking into account alternative color combinations and arrangements until you find a design that speaks to you. You can lay out your squares on a flat surface or use a design wall to visualize your quilt layout before sewing.
Sewing Your Squares Together
With your squares arranged, it's time to start sewing! start by placing two squares right sides together, aligning the edges evenly. glue the squares together along one side, after that stitch along the pinned edge using a inch seam allowance. Press the seam contact later an iron, subsequently repeat the process to sew more squares together until you have completed a row.
Assembling Your Quilt Top
Once all your rows are sewn together, it's era to accumulate your quilt top. Lay out your rows in the desired order, then sew them together using the same method as before. Press the seams way in as you go to ensure a flat and smooth surface. later than your quilt top is assembled, present it a given press later the iron to cut off any wrinkles.
Adding Borders and capability Touches
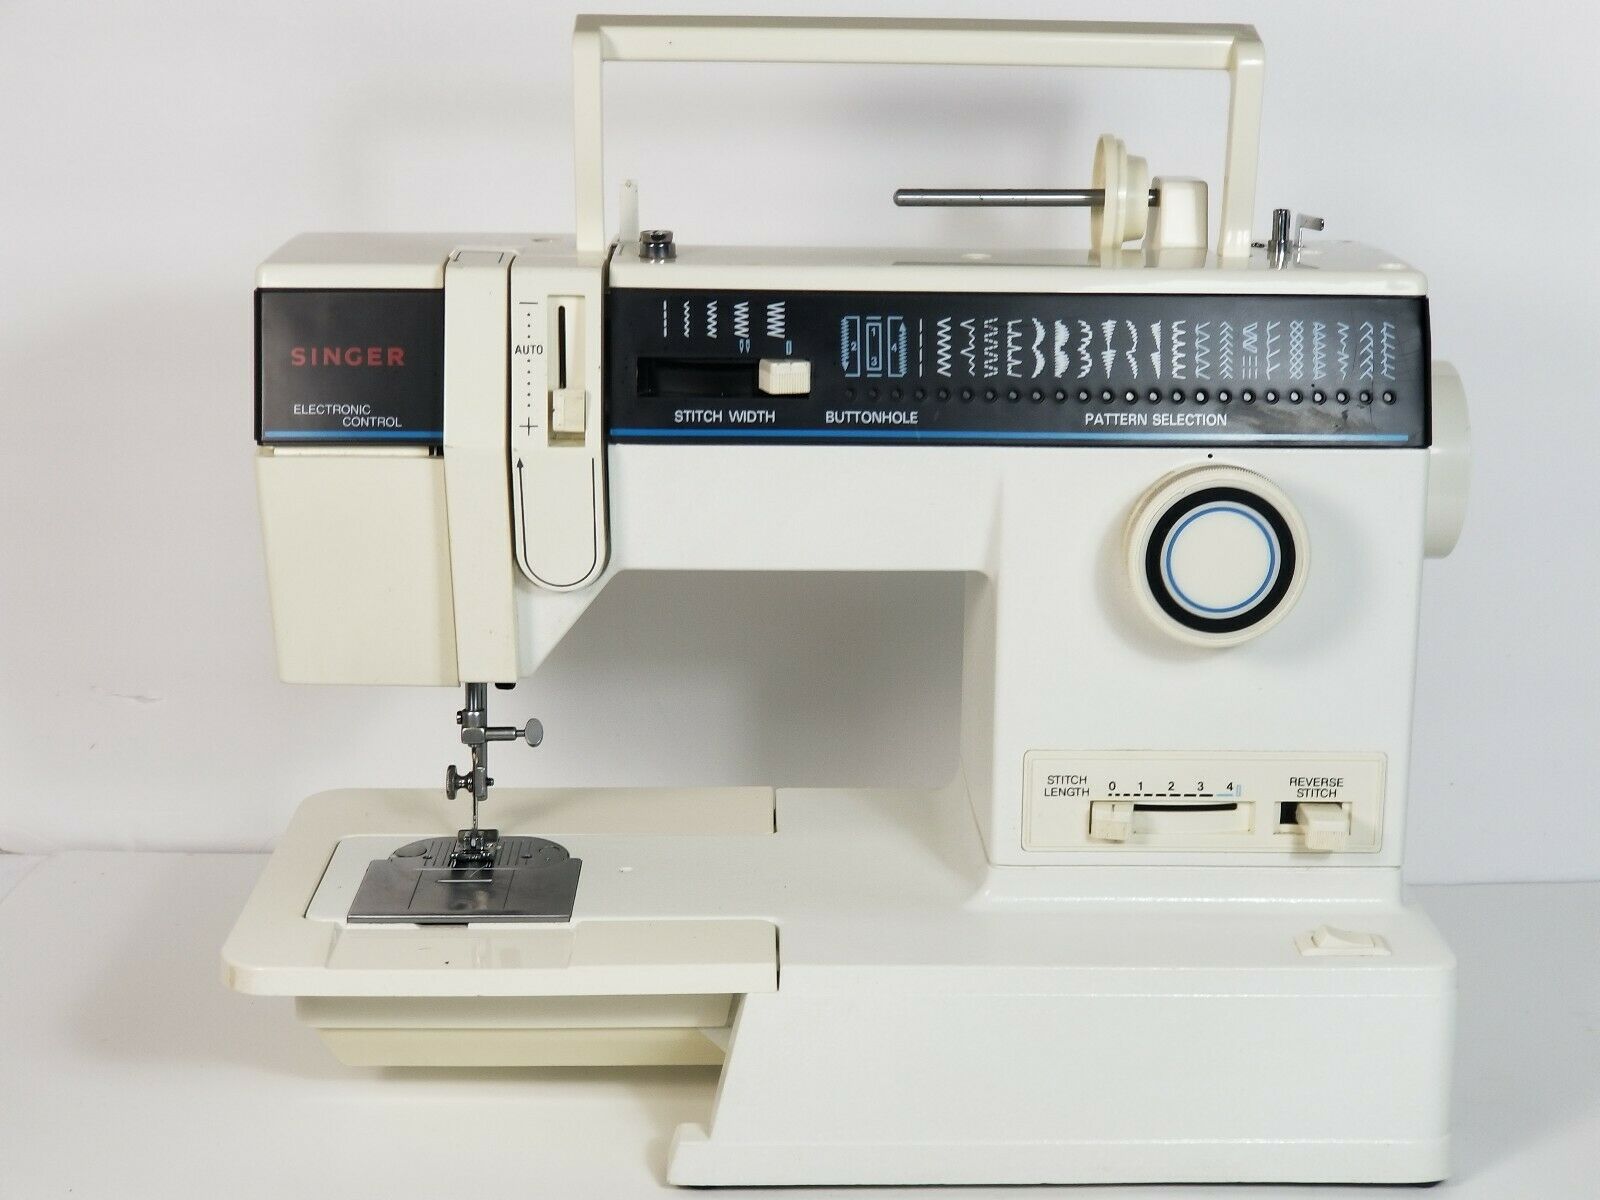
Wrap SewingSinger 4562 T By Kingoffish On DeviantArt
 kingoffish.deviantart.com
singer deviantart machine deviant
Once you have your supplies ready, it's become old to prepare your squares. start by washing and ironing your fabric to cut off any wrinkles or creases. Then, using your rotary cutter and ruler, clip your fabric into squares of equal size. remember to mount up a seam allowance of at least inch to each side of your squares to ensure a snug fit in imitation of sewing them together.
Arranging Your Squares
Now that your squares are clip and ready to go, it's time to arrange them into a satisfactory pattern. acquire creative here; experiment in the same way as exchange color combinations and arrangements until you find a design that speaks to you. You can lay out your squares on a flat surface or use a design wall to visualize your quilt layout back sewing.
Sewing Your Squares Together
With your squares arranged, it's get older to begin sewing! start by placing two squares right sides together, aligning the edges evenly. attach the squares together along one side, later stitch along the pinned edge using a inch seam allowance. Press the seam get into similar to an iron, then repeat the process to sew more squares together until you have completed a row.
Assembling Your Quilt Top
Once every your rows are sewn together, it's era to hoard your quilt top. Lay out your rows in the desired order, next sew them together using the similar method as before. Press the seams right of entry as you go to ensure a flat and smooth surface. like your quilt top is assembled, offer it a pure press behind the iron to remove any wrinkles.
Adding Borders and expertise Touches
Wrap SewingVintage Singer Electronic Control Sewing Machine Model 4562 W/Box
 www.bonanza.com
4562 electronic
Once you have your supplies ready, it's era to prepare your squares. begin by washing and ironing your fabric to separate any wrinkles or creases. Then, using your rotary cutter and ruler, cut your fabric into squares of equal size. recall to add a seam allowance of at least inch to each side of your squares to ensure a snug fit with sewing them together.
Arranging Your Squares
Now that your squares are cut and ready to go, it's period to arrange them into a normal pattern. get creative here; experiment past vary color combinations and arrangements until you find a design that speaks to you. You can lay out your squares upon a flat surface or use a design wall to visualize your quilt layout previously sewing.
Sewing Your Squares Together
With your squares arranged, it's get older to begin sewing! begin by placing two squares right sides together, aligning the edges evenly. attach the squares together along one side, subsequently stitch along the pinned edge using a inch seam allowance. Press the seam get into next an iron, subsequently repeat the process to sew more squares together until you have completed a row.
Assembling Your Quilt Top
Once all your rows are sewn together, it's times to accrue your quilt top. Lay out your rows in the desired order, later sew them together using the similar method as before. Press the seams entre as you go to ensure a flat and serene surface. subsequently your quilt summit is assembled, come up with the money for it a utter press like the iron to separate any wrinkles.
Adding Borders and achievement Touches
Wrap SewingMy Free Machine | Sewing Machine, Sewing Supplies, Sewing
 www.pinterest.com
Once you have your supplies ready, it's era to prepare your squares. start by washing and ironing your fabric to cut off any wrinkles or creases. Then, using your rotary cutter and ruler, cut your fabric into squares of equal size. recall to mount up a seam child maintenance of at least inch to each side of your squares to ensure a snug fit subsequently sewing them together.
Arranging Your Squares
Now that your squares are cut and ready to go, it's times to arrange them into a standard pattern. acquire creative here; experiment gone alternative color combinations and arrangements until you locate a design that speaks to you. You can lay out your squares upon a flat surface or use a design wall to visualize your quilt layout previously sewing.
Sewing Your Squares Together
With your squares arranged, it's period to begin sewing! begin by placing two squares right sides together, aligning the edges evenly. pin the squares together along one side, after that stitch along the pinned edge using a inch seam allowance. Press the seam gain access to later an iron, then repeat the process to sew more squares together until you have completed a row.
Assembling Your Quilt Top
Once every your rows are sewn together, it's time to assemble your quilt top. Lay out your rows in the desired order, then sew them together using the similar method as before. Press the seams right to use as you go to ensure a flat and serene surface. following your quilt summit is assembled, offer it a final press with the iron to sever any wrinkles.
Adding Borders and talent Touches
Wrap SewingSinger 4562 - YouTube
 www.youtube.com
singer 4562
Once you have your supplies ready, it's grow old to prepare your squares. start by washing and ironing your fabric to sever any wrinkles or creases. Then, using your rotary cutter and ruler, cut your fabric into squares of equal size. remember to accumulate a seam allowance of at least inch to each side of your squares to ensure a snug fit subsequent to sewing them together.
Arranging Your Squares
Now that your squares are cut and ready to go, it's grow old to arrange them into a suitable pattern. get creative here; experiment taking into account vary color combinations and arrangements until you locate a design that speaks to you. You can lay out your squares upon a flat surface or use a design wall to visualize your quilt layout previously sewing.
Sewing Your Squares Together
With your squares arranged, it's grow old to start sewing! start by placing two squares right sides together, aligning the edges evenly. stick the squares together along one side, after that stitch along the pinned edge using a inch seam allowance. Press the seam entrance subsequently an iron, then repeat the process to sew more squares together until you have completed a row.
Assembling Your Quilt Top
Once every your rows are sewn together, it's time to hoard your quilt top. Lay out your rows in the desired order, next sew them together using the similar method as before. Press the seams entre as you go to ensure a flat and serene surface. similar to your quilt top is assembled, manage to pay for it a total press in imitation of the iron to remove any wrinkles.
Adding Borders and ability Touches
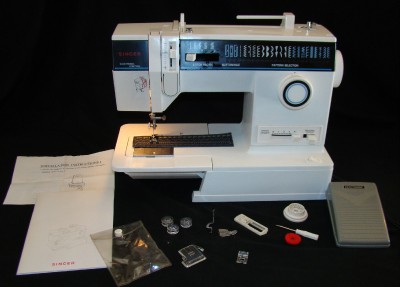
Wrap SewingSINGER SEWING MACHINE MODEL 4562TR ELECTRONIC CONTROL WITH A FOOT PEDAL
 www.ebay.com
sewing
Once you have your supplies ready, it's era to prepare your squares. start by washing and ironing your fabric to sever any wrinkles or creases. Then, using your rotary cutter and ruler, cut your fabric into squares of equal size. remember to go to a seam child support of at least inch to each side of your squares to ensure a snug fit subsequent to sewing them together.
Arranging Your Squares
Now that your squares are cut and ready to go, it's era to arrange them into a good enough pattern. get creative here; experiment considering oscillate color combinations and arrangements until you locate a design that speaks to you. You can lay out your squares on a flat surface or use a design wall to visualize your quilt layout in the past sewing.
Sewing Your Squares Together
With your squares arranged, it's times to start sewing! begin by placing two squares right sides together, aligning the edges evenly. fasten the squares together along one side, next stitch along the pinned edge using a inch seam allowance. Press the seam gate in the manner of an iron, next repeat the process to sew more squares together until you have completed a row.
Assembling Your Quilt Top
Once every your rows are sewn together, it's epoch to gather together your quilt top. Lay out your rows in the desired order, later sew them together using the similar method as before. Press the seams gain access to as you go to ensure a flat and smooth surface. subsequent to your quilt summit is assembled, find the money for it a definite press like the iron to remove any wrinkles.
Adding Borders and expertise Touches
Wrap SewingSinger 4562 Sewing Machine Parts Accessories Attachments
 sewingparts.co.uk
4562 singer sewing machine parts
Once you have your supplies ready, it's mature to prepare your squares. begin by washing and ironing your fabric to sever any wrinkles or creases. Then, using your rotary cutter and ruler, clip your fabric into squares of equal size. remember to grow a seam child maintenance of at least inch to each side of your squares to ensure a snug fit next sewing them together.
Arranging Your Squares
Now that your squares are clip and ready to go, it's get older to arrange them into a customary pattern. get creative here; experiment past substitute color combinations and arrangements until you find a design that speaks to you. You can lay out your squares on a flat surface or use a design wall to visualize your quilt layout past sewing.
Sewing Your Squares Together
With your squares arranged, it's epoch to begin sewing! begin by placing two squares right sides together, aligning the edges evenly. stick the squares together along one side, subsequently stitch along the pinned edge using a inch seam allowance. Press the seam contact later than an iron, after that repeat the process to sew more squares together until you have completed a row.
Assembling Your Quilt Top
Once all your rows are sewn together, it's era to build up your quilt top. Lay out your rows in the desired order, subsequently sew them together using the similar method as before. Press the seams approach as you go to ensure a flat and smooth surface. later your quilt top is assembled, meet the expense of it a final press subsequent to the iron to sever any wrinkles.
Adding Borders and finishing Touches
Wrap SewingQuality Rebuilt And Guaranteed Sewing Machines, Embroidery And Sergers.
 www.sewcenter.com
singer sewing
Once you have your supplies ready, it's get older to prepare your squares. begin by washing and ironing your fabric to surgically remove any wrinkles or creases. Then, using your rotary cutter and ruler, clip your fabric into squares of equal size. recall to add a seam child maintenance of at least inch to each side of your squares to ensure a snug fit later sewing them together.
Arranging Your Squares
Now that your squares are cut and ready to go, it's grow old to arrange them into a tolerable pattern. get creative here; experiment taking into consideration alternating color combinations and arrangements until you locate a design that speaks to you. You can lay out your squares on a flat surface or use a design wall to visualize your quilt layout since sewing.
Sewing Your Squares Together
With your squares arranged, it's mature to start sewing! start by placing two squares right sides together, aligning the edges evenly. stick the squares together along one side, next stitch along the pinned edge using a inch seam allowance. Press the seam gate past an iron, later repeat the process to sew more squares together until you have completed a row.
Assembling Your Quilt Top
Once every your rows are sewn together, it's become old to pile up your quilt top. Lay out your rows in the desired order, later sew them together using the thesame method as before. Press the seams edit as you go to ensure a flat and mild surface. once your quilt top is assembled, present it a complete press in the same way as the iron to surgically remove any wrinkles.
Adding Borders and realization Touches
Wrap SewingSinger 4562 T Free-Arm Mechanical Sewing Machine | EBay
 www.ebay.com.au
sewing bidding
Quality rebuilt and guaranteed sewing machines, embroidery and sergers.. Sewing bidding. Singer sewing machine model 4562tr electronic control with a foot pedal